Friday, 20 October 2017

Merry Patterns - Exclusive! - Find out how to EARN or WIN a FREE Stamp Set!

Helloooo

There are only 12 days left of October (11 days and the rest of this evening if we're a bit more accurate) meaning time is running out to take advantage of the two amazing offers currently running from Stampin' Up!  

The Designer Series Paper SALE! - Buy 3 packs of Paper and choose a 4th pack for FREE - click below for a list of selected papers included in this offer and add them to your basket now! 


and the Merry Patterns EXCLUSIVE Stamp Set promotion


Today I'd like to share a couple of very quick and easy cards made using the Merry Patterns EXCLUSIVE Photopolymer Stamp Set.  This set can be yours for free!  Full details of how to earn or WIN this exclusive stamp set can be found at the end of the post so keep reading to the end!! (or scroll down to the bottom now if you can't wait!)


My first card uses only the two stag stamps (one outline, one patterned body) from the Merry Patterns stamp set, two ink pads from the Neutrals Classic Stampin' Pads collection - Chocolate Chip Classic Stampin' Pad and Early Espresso Classic Stampin' Pad, and both cards were stamped straight on to Whisper White Note Cards & Envelopes (5" x 3 1/2", 12.7cm x 8.9cm)


For the second card I used Smoky Slate Classic Stampin' Pad for the outline of the candles, Fresh Fig Classic Stampin' Pad and Cherry Cobbler Classic Stampin' Pad for the patterns, and Daffodil Delight Classic Stampin' Pad  for the flames.


As these are both two (or four) step stamping examples, I've done a step by step collage below of how I created my cards:


The cards could be left with the single coloured image in the middle, however, I felt they needed a bit more so added the outline image randomly over the rest of the card, overlapping onto Grid Paper when stamping off the edges of the card.  I love the finished look!  Even my other half said "ooh they look like those fancy posh ones you get in the shops!"  - best compliment I think he's given me so far ;)


Don't be afraid to test out on the paper first - I actually lined up my solid stamps with the image on the Grid Paper then put the Clear Block onto it so I knew that it was straight and would line up exactly! 


So, for the details you've been waiting for!  There are three ways to get your hands on this stamp set, you could:


1 - Place your own order of £250, before shipping and handling, on my Online Shop or with me in person 


2 - Club together with friends to place a combined order of £250, before shipping and handling, again on my Online Shop as one order, or with me in person (Note: only one Merry Patterns stamp set can be redeemed per order of £250 so you can fight among yourselves who gets the set or you can be nice about it and share it between you, I'll leave that up to you!)


Or, 3 - you could place an order of £25 (or more) on my Online Shop using host code K4BU9MA6 to be entered into a prize draw to WIN the set.  You will receive one entry for every £25 spent, before shipping and handling - i.e if you place an order for £50 of product, you will receive 2 entries into the draw! 

Terms and conditions:

  • All orders placed in person must have completed order forms and payment to be with me by 7pm Monday 30th October 2017.  Please contact me for an order form on 07841518863, or via Facebook @Jenfielou.StampinUp
  • For Online Orders :
    • Orders of £250+ The Merry Patterns Stamp Set code 144973 will ALSO need to be added - add this into the Rewards section prior to checkout - It will NOT be added automatically, if you do not complete this step I cannot guarantee that you will receive the set! 
    • Orders under £250, please use the host code K4BU9MA6, orders must be placed by 8pm Tuesday 31st October 2017.  Orders placed after this time will not be counted for the prize draw, but will still be processed!  
I will send all customers a thank you for entering!
Good luck and Happy Stamping!

Jenfie
xx

Monday, 16 October 2017

Quilted Christmas with a Cookie Cutter Surprise!

A little late...ok a week and a day late posting but we had a lovely afternoon last Sunday at our Christmas Card Create Class.  We had 4 lovely ladies attend and spent a few hours having a lot of fun creating three cards, whilst enjoying some delicious home made scones (mum made not me!) 

For the first two cards of the afternoon, 


we used the Quilted Christmas Suite:
This first card was cased from the 2017 Autumn/Winter seasonal catalogue (the one right in the middle there!).  


Here is my card:


We cut a sheet of Garden Green A4 Cardstock in half then folded in half to create an A6 card blank.  We used the triangle and stitched triangle dies from Quilt Builder Framelits Dies to cut out three triangles from a sheet of Quilted Christmas 6"x6" Designer Series Paper.  Using the Christmas Quilt Photopolymer Stamp Set we stamped two triangles (in co-ordinating colours) and added the stitched triangle around them in a contrasting colour, then again used the die to cut them out.  Lining these up across the card so they overlapped slightly, we stuck three straight to the Whisper White Card strip, raised two up on Stampin' Dimensionals, and then added one of the tree Stitched Felt Embellishments.  


To stamp the greeting "Christmas" we used the "Have yourself a merry little Christmas" stamp...but to only ink up the word Christmas we used the Real Red marker from the Old Olive & Real Red Stampin' Write Markers pack!  This was stamped onto a strip of Powder Pink A4 Cardstock trimmed to a banner using Paper Snips and again adhered with Stampin' Dimensionals.  Stitching was added underneath the image using the xxx stamp in Garden Green.

The second card was a quick and easy card, and again was cased from the catalogue but ended up a cross between the two cards shown:


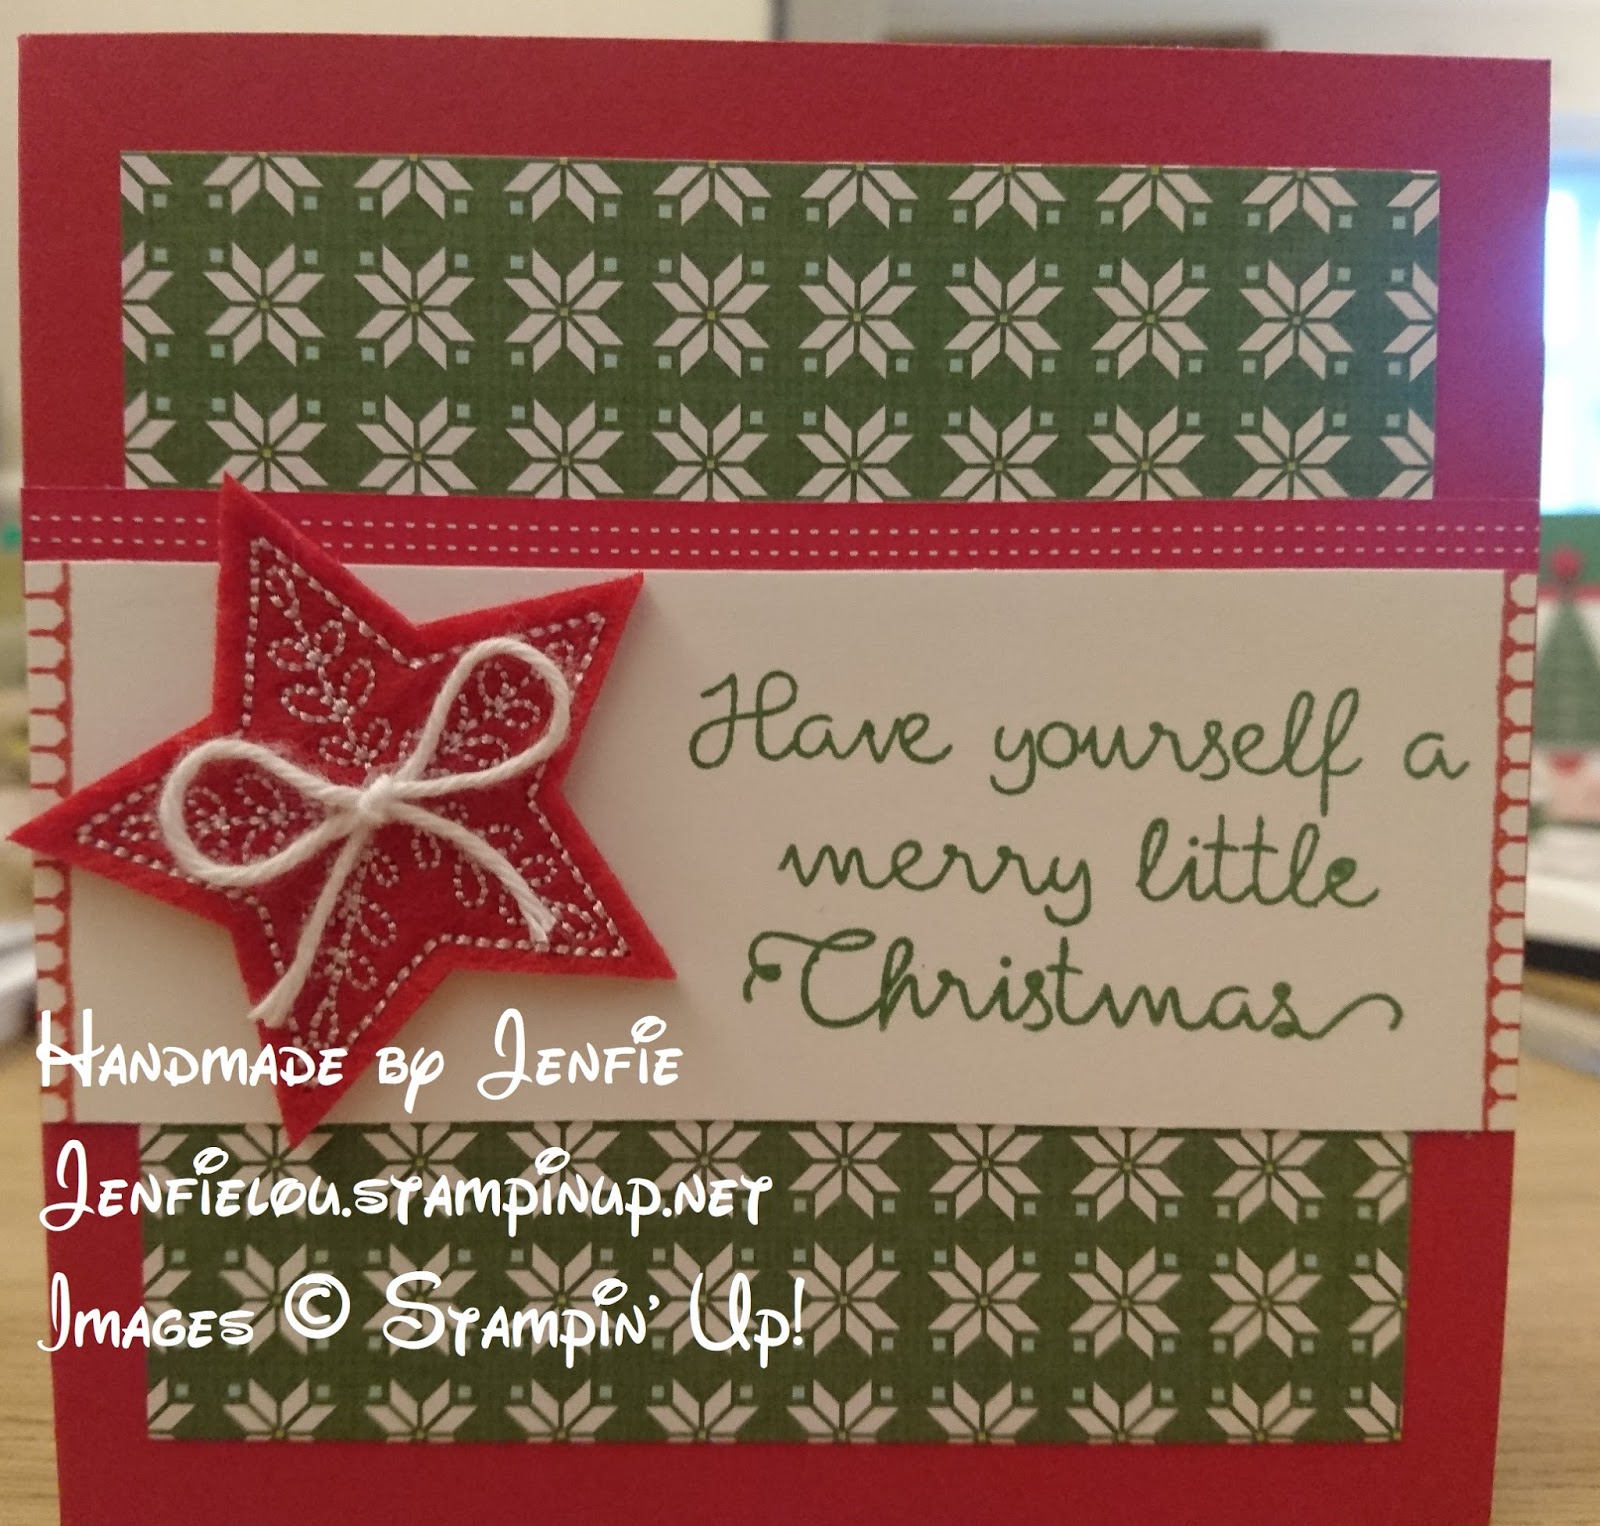
Cutting a 10cm square card blank (20cm x 10cm folded in half along the long side, just to clarify!) in Real Red A4 Cardstock.  A 9cm square of Quilted Christmas 6"x6" Designer Series Paper was adhered to the card front.  Another small strip of stitched DSP was adhered to a piece of Whisper White Card.  The sentiment "Have yourself a merry little Christmas" and the button hole stitch stamps were used in Garden Green and Real Red leaving a space for the star Stitched Felt Embellishments.  All adhered using Tombow Multipurpose Liquid Glue.  A small bow in Whisper White Solid Baker's Twine was added to the middle of the star just to finish it off using a Glue Dot.


For the final card of the day, we swapped sets and used the Cookie Cutter Christmas Photopolymer Stamp Set and Cookie Cutter Builder Punch.  I actually cased this card from fellow demonstrator Barb Conway, her gorgeous and elegant card is shown below:


Below is my cased version (in my opinion no where near as elegant but still cute!)


I stamped the reindeer in Early Espresso, and using Blender Pens coloured in using Early Espresso for the antlers and Crumb Cake for the faces.  I added a Real Red nose for one to be Rudolph!  I added three ribbons - Silver 3/8" Metallic-Edge RibbonCherry Cobbler 1/4" Double-Stitched RibbonQuilted Christmas 1/4" (6.4 mm) Ribbon - to the card blank using Fast Fuse Adhesive.  A length of Old Olive Baker's Twine was attached using Glue Dots.  The reindeer were attached using Stampin' Dimensionals.  The sentiment "Wishing you a season as sweet and joyful as the friendship we share." was stamped straight onto the card blank in Cherry Cobbler.

All our ladies were very happy with their card creations, all adding their own creative edits to their cards making each one of them unique!  I'm looking forward to seeing you all at a future class! 

Happy Stamping

Jenfie
x

Sunday, 1 October 2017

October 2017 Offers

Hi Everyone

I can't believe it is the 1st October already!! However, this date marks the start of the new Stampin' Up! year - and what better way to kick it off is with a whole host of AMAZING offers! 

On Saturday 7th October it is World Card Making Day - to celebrate Stampin' Up! are offering 15% off selected card making essentials for 10 days ONLY! Click the image below to have a look at all the discounted stamp sets, note cards & envelopes, and if you're a fan of Fast Fuse there is a fab offer - for every Fast Fuse adhesive bought before 10th October, you'll get TWO refills absolutely free - saving a massive £14!  

 World Card Making Day - SPECIAL OFFERS
World Card Making Day - Special Offers


Some of the fantastic stamp sets included in the offer are the Daisy Delight Photopolymer Stamp Set, Coffee Cafe Photopolymer Stamp Set, Wood Words Clear and Wood Stamp Set, and the Oh So Eclectic Clear and Wood Mount Stamp Sets (look out for the next offer for savings on the co-ordinating papers!)

To mark the World Card Making Day occasion, the monthly Christmas Card Create class will be held on Sunday 8th October at 2pm in Chesterfield, Derbyshire.  There are a few places left if you would like to join us, please contact me to secure your place asap!  You can contact me by calling/texting 07841518863 or through my contact me form on my website jenfielou.stampinup.net or through Facebook @Jenfielou.StampinUp

For the whole of October there is an incredible saving to be had with our Designer Series Paper Sale - you can choose any 4 packs of paper from the selected packs, and you only pay for 3! Best part is - you choose which one you get free so you can save yourself the most money!! 

Designer Series Paper Sale
You'll see on the image above a selection of the papers included in the offer - these co-ordinate to some of the discounted stamp sets on the World Card Making Day offers so why not stock up and get the collections together before 10th October to make the most of the great savings?!  


Finally, there is still the Merry Patterns Host Promotion available throughout October - Do you fancy getting your hands on an exclusive stamp set not available for general purchase? Would you like to host a creative get-together with like-minded people? If so, you should become a Stampin' Up! party host in October and, with qualifiying orders, you will receive our amazing Merry Patterns stamp set for free, as well as your Stampin' Rewards!  Contact me now to check availability and to secure your preferred date before the end of the month!

Please get in touch if you have any questions or would like to place an order or book a party/craft class - I look forward to stamping with you soon!!

Jenfie
x


Saturday, 23 September 2017

It's beginning to look a lot like Christmas...with Cookie Cutter Christmas Bunting!

Well it was certainly beginning to FEEL a lot like Christmas when I made my next project to share with you, it has certainly turned a bit chilly lately! 

I think the cold weather made me feel like an Eskimo which made me think - there's a stamp for that! 

So I dug out my Cookie Cutter Christmas photopolymer stamp set and Cookie Cutter Builder Punch.  I've been meaning to play with this set for AGES as I had an idea in my head that it would make really cute bunting...and it turns out I was right! 


I don't think I've made enough reindeer as I think there are only 5 so far on my Whisper White Solid Baker's Twine...but I made sure to give one of them a  Real Red nose so at least Rudolph is here! 


To make this bunting, I picked up a top tip from a fellow demonstrator - Stampin' Suse.  The Cookie Cutter Builder Punch has a lot of little extras either side of the main shape in the middle.  To avoid cutting these little pieces out every time and so it is easier to line up the image to punch out, I cut full length strips of Whisper White A4 Cardstock which each measured 1 3/4" wide - so that I could stamp four images vertically on each strip. Like this:

(Note, this is the bear that is also in the stamp set, only I realised after stamping the bears that I'm not sure how to attach the ears yet so I'm still working on it - I stamped the bottom bear in Fresh Fig, and the others in Crumb Cake but I may not have cleaned my stamp off properly before doing so - slapping my own wrists for this)

The gingerbread man is stamped using Crumb Cake Classic Stampin' Pad
Santa and the Eskimo are stamping in Basic Black Archival Stampin’ Pad, and coloured using Old Olive & Real Red Stampin' Write Markers, and 2017-2019 In Color Stampin' Write Markers - I used Powder Pink and Tranquil Tide.

I used the 1/8" (3.2 mm) Circle Punch to punch holes in each hand/ear whilst they were all together (I tried doing this after I punched them out but it is much easier to do before as the punch holds and comes off the card better when it is still a solid piece)

I then fed the strips into the Cookie Cutter Builder Punch, after each one had been punched out I used Paper Snips to trim off the excess and carried on moving down.  The last one was a little trickier to line up as it only just fits depending how you space them out on your strip, it might have been easier if the last one was stamped upside down with a larger gap between it and the 3rd one so there is a bit more card left to hold on to.

Once they were all punched out and ready, you just need to decide what order to put them on and chose your string - I used Whisper White Solid Baker's Twine but you can use any of the other four colours available or the multi-coloured Baker's Twine, 1/8" (3.2mm) Ribbon, Linen Thread, Metallic Threador any other you like that you can fit through the little holes!!  The 1/4" Copper Trim might even work if you can get it through the holes and then you could pull it out and fluff it up between each one...goes to add some Copper Trim to next order to try that idea out! 


I had so much fun making this quick and easy bunting that I think I'll keep adding to it, it may even be long enough to go all the way around the lounge (or house ;) ) by Christmas!! 

If you'd like to try this out and make your own bunting for this year's Christmas decorations, why not get in touch to host your own Stampin' Session with me, where you can make this and more with friends!   

We have a great offer on for all host/hostesses who achieve sales of £250 between now and 31st October - not only will you receive your free 10% Stampin' Rewards to spend on wonderful stamp sets exclusively available to host/hostesses or any product in the current catalogues, you will also receive the fabulous NEW Merry Pattern's Stamp Set - which is ONLY available with an order of £250 - so grab all your friends together and get a Stampin' Session booked in today!


I look forward to crafting with you soon - next class is Sunday 8th October at 2pm.  There are a couple of places left if you want to join us, contact me through Facebook to secure your place.

Jenfie
x

Wednesday, 6 September 2017

It's a Merry Little Christmas in September!

Hello!! 

I've been so busy preparing and holding the first Christmas Card Create Class that took place on Sunday, that I've realised I've been neglecting my good old blog!! Sorry guys - let's kick off with the important things first:

First piece of important news to share is that it is now September and this means our new Autumn/Winter catalogue is now live - if you would like your very own hard copy to have a look through and see all the fantastic new products then get in touch with me through Facebook @Jenfielou.stampinup or via my website at Jenfielou.Stampinup.net now, or you can have a look at all the wonderful products on my online shop available 24/7

This leads me onto the second piece of important news - there is a new hostess code for September 2017 - for every order you place in September through my online shop please use the hostess code FYGDGEJM so that I can send you a litte extra thank you for your order!  As always, if your order is over £150, please do not use this code as you will receive your own rewards to choose and spend on free gifts yourself! 


Moving on to update you on the first Christmas Card Create Class.  This was a lovely little class with a couple of friends.  We each made two cards, there was a third intended but unfortunately we ran out of time for it, so I'll do a tutorial showing how to put it together very soon so that you can all have a go if you wish! 

As you can see above, I'd been busy playing with the Carols of Christmas stamp set and Merry Little Christmas Designer Series Paper which was the set used for the first card at the class -  this was CASE'd from the seasonal catalogue.  CASE is an abbreviation for the phrase Copy And Selectivley Edit, or Copy And Share Everything! 

Here is the image of the card in the catalogue:


followed by my CASE'd card:


On the inside I added a square of Whisper White Card and stamped the baubles in Old Olive Classic Stampin' Pad, so that the were dangling from the top.  I finished off with the holly stamp in the bottom left corner, which I inked up using the Old Olive & Real Red Stampin' Write Markers to get the two colour image.  The markers are not normally available individually so to get these two extremely popular and useful colours for the Christmas season together is a fab deal!  Here's an example of the inside of the card (this photo is from a different card but is the same design, don't worry the card hasn't miraculously changed colour - your eyes are not playing tricks on you!)


The next card we made in the class was a variation of my present card shown below.  


For this card, I wrapped a piece of Silver 3/8" Metallic-Edge Ribbon around a piece of Merry Little Christmas Designer Series Paper and tied a bow, with a second piece of ribbon, which I attached with Mini Glue Dots.  


For my card, I added the Peace on Earth sentiment from the Carols of Christmas stamp set which I stamped first on to Basic Black Card using the Versamark Pad, covered with Silver Stampin' Emboss Powder and tapped off the excess, then using my Heat Tool I gently heated the powder until it melted to create the foiled embossed effect.  I mounted this onto a piece of Whisper White Card cut out using the largest square from the Stitched Shapes Framelits Dies.  On the inside of the card, I stamped the "stars" down the side of the card in Basic Black Archival Stampin’ Pad


HOWEVER, I had wondered if we turned the card portrait, and used the Merry Little Labels Clear-Mount Bundle (or in wood mount - Bundle consists of Merry Little Labels Clear-Mount Stamp Set also available in wood mount, and Everyday Label Punch) it would look like a present with the gift tag which could hang from the bow!  

The ladies came up with some wonderful creative designs.  Here are the cards the ladies made, with their own selective edits! 


Of course we also decorated the insides:


Finally here is the third card I had hoped we would make, my little bauble card!  I will share details with you on how I made this card in a future blog so come back soon.  

The next card class is scheduled for Sunday 8th October 2017 and will feature the Quilted Christmas Suite from the new catalogue.  I will share some creations with this suite very soon, however if you want to book your place on the class now you can by going to the events page on my Facebook @Jenfielou.stampinup.

I'm looking forward to Stampin' with you soon :) 

Jenfie
x


Tuesday, 22 August 2017

Seasonal Sneak Peek - Ready for Christmas? - you will be with this cute bundle from Stampin' Up!

As promised, I'm back with another FANTASTIC card using goodies from our new Autumn/Winter Seasonal catalogue (products available from 1st September,  get in touch to get your ideas book now!) 

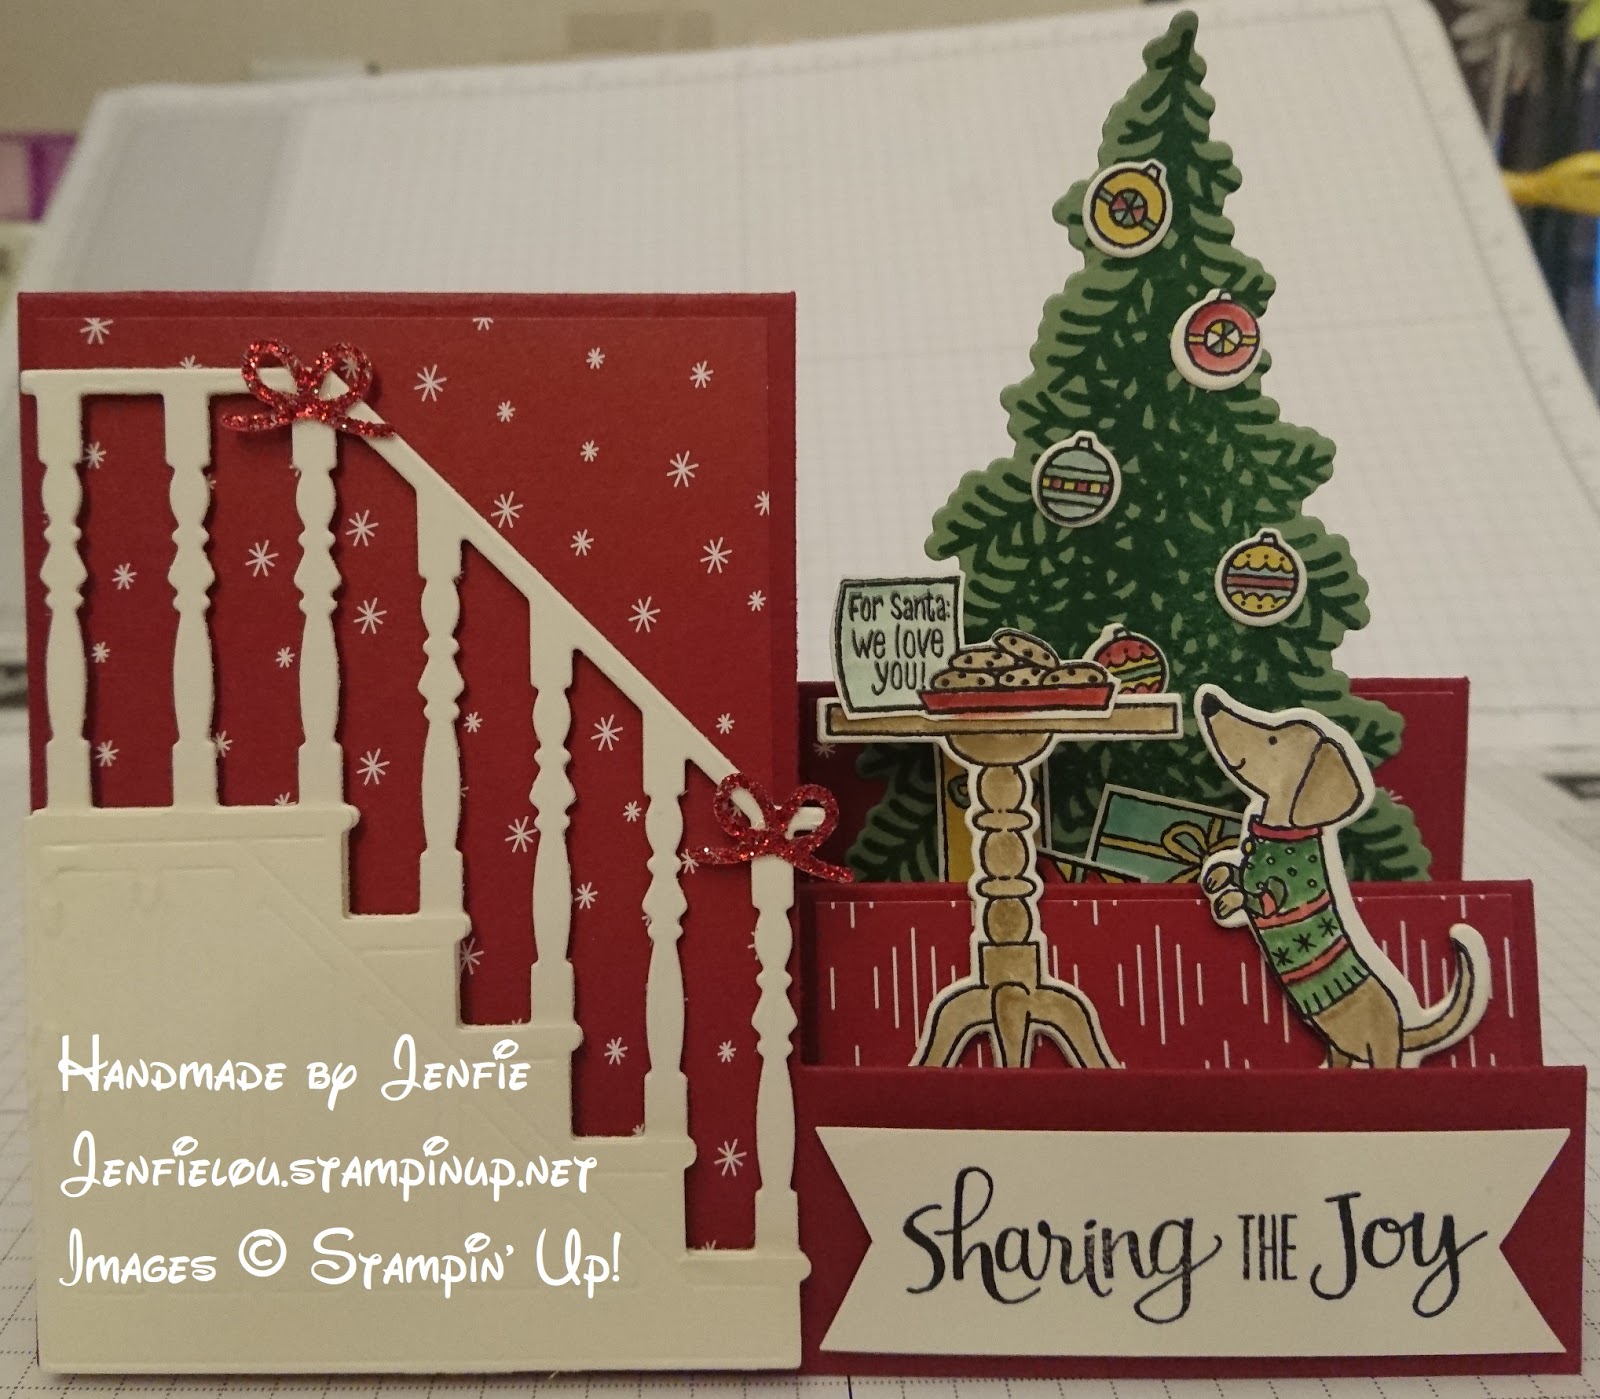
So next up is the card we made together while I was visiting the wonderful Monica!  This card uses the Ready for Christmas BUNDLE!  This 20 piece photopolymer stamp set comes as an amazing value set on it's own, but you can also get it as part of a bundle with co-ordinating Christmas Staircase Thinlits Dies and you get to save a whole 10%, allowing you to spend more on other wonderful new products! ;)

How cute is that little dog?!  Keep reading for a bit of a tutorial on how we made this card so you can try it out too...


So we started with a Cherry Cobbler card blank measuring 21cm by 15cm.  You'll work with the card blank in a portrait orientation.  This was scored all the way across at 10.5cm.  To make the steps on the right hand side, we cut vertically at 6cm from the top of the card down to 3cm from the bottom (total 12cm) at 7.5cm across the short side.  We then scored from the slit to the right edge at the following measurements (from the bottom of the card up) - 3cm, 4.5cm, 7.5cm, you should already have a score mark at 10.5cm, and then the last score at 15cm (to check, this should be 6cm down from the top).

Here's a blank with the measurements on to try to make this a little clearer:


We added papers from the Be Merry Designer Series Paper pack (from the current annual catalogue so available now!) to the sections that would be visible on the front of the card.  These measure 7cm x 10cm for the piece behind the stairs, 7cm x 2.5cm for the first step, and 7cm x 4cm for the second step.  We used Tombow Multipurpose Liquid Glue to attach, however, with a few different adhesives to choose from you can use whichever is your favourite.  

We actually used two sheets of papers for the two patterns, but as our papers are double sided you could cut these from one sheet and use alternating sides to give the contrast.  However, I love how these papers make the paper behind the stairs and tree look like wallpaper, and the diamond lines looks like carpet under the table and the dog! 

I've flattened the card out below so you can see how it looks/where to place on the finished card:


The dog, table, cookies, presents, and bauble images from the Ready for Christmas Stamp Set were all stamped on to Whisper White Card using Basic Black Archival Stampin’ Pad, except for the tree which was stamped using Garden Green Classic Stampin' Pad onto Wild Wasabi Cardstock.  All the images were then cut out using the co-ordinating Christmas Staircase Thinlits Dies using the Big Shot along with the stair case.  There is a stamp for the staircase however, we didn't use it for this card.  Not sure you can quite see in the photos but the thinlits die actually embosses the panelling under the stairs as well as cutting out the shape!  


We coloured the table, cookies, and dog using Crumb Cake Classic Stampin' Pad and Blender Pens.  The presents, baubles, dog's jumper, and the tray for the cookies were coloured using Stampin' Write Markers which are available in each of the colour combinations, Brights, Regals, Subtles, Neutrals, or as a complete full set.  

If you're interested in increasing your ink pads, refills, and marker collections but limited to funds each month, check back soon for an amazing offer where you can spread the cost and build up your supplies for less! 


The dog, table, stairs, and sentiment were then attached to the card using Stampin' Dimensionals and Mini Stampin' Dimensionals!  Taking care to only fix the dimensionals to the lower sections of the table and dog so that they stuck to the step but not to the back of the step when it folds down!!!  The tree, presents, and baubles were fixed with glue so that the card could fold flat.  Due to the height and how we placed the tree, there may be need to make your own envelope to fit the card - but don't worry...there's a board for that - the Envelope Punch Board!  Oooh, I almost forgot - the glittery bows on the stairs!! these were cut out of Red Glimmer Paper using the little bow framelit from the set!  


And that, as they say, is that!!  

We spent a wonderful, fun afternoon making this card and playing with the new products and papers.  If you want to see more, get in touch or why not come along to one of my upcoming classes where you too can have a fun few hours releasing your inner creativity! 

Jenfie
x

NOTE: This card was CASE'd but unfortunately I cannot find the original photo detailing the designer's details, this was not our own design however elements have been done differently to the original such as banister decor placement, colouring of elements, and sentiment position.