Tuesday 22 August 2017

Seasonal Sneak Peek - Ready for Christmas? - you will be with this cute bundle from Stampin' Up!

As promised, I'm back with another FANTASTIC card using goodies from our new Autumn/Winter Seasonal catalogue (products available from 1st September,  get in touch to get your ideas book now!) 

So next up is the card we made together while I was visiting the wonderful Monica!  This card uses the Ready for Christmas BUNDLE!  This 20 piece photopolymer stamp set comes as an amazing value set on it's own, but you can also get it as part of a bundle with co-ordinating Christmas Staircase Thinlits Dies and you get to save a whole 10%, allowing you to spend more on other wonderful new products! ;)

How cute is that little dog?!  Keep reading for a bit of a tutorial on how we made this card so you can try it out too...


So we started with a Cherry Cobbler card blank measuring 21cm by 15cm.  You'll work with the card blank in a portrait orientation.  This was scored all the way across at 10.5cm.  To make the steps on the right hand side, we cut vertically at 6cm from the top of the card down to 3cm from the bottom (total 12cm) at 7.5cm across the short side.  We then scored from the slit to the right edge at the following measurements (from the bottom of the card up) - 3cm, 4.5cm, 7.5cm, you should already have a score mark at 10.5cm, and then the last score at 15cm (to check, this should be 6cm down from the top).

Here's a blank with the measurements on to try to make this a little clearer:


We added papers from the Be Merry Designer Series Paper pack (from the current annual catalogue so available now!) to the sections that would be visible on the front of the card.  These measure 7cm x 10cm for the piece behind the stairs, 7cm x 2.5cm for the first step, and 7cm x 4cm for the second step.  We used Tombow Multipurpose Liquid Glue to attach, however, with a few different adhesives to choose from you can use whichever is your favourite.  

We actually used two sheets of papers for the two patterns, but as our papers are double sided you could cut these from one sheet and use alternating sides to give the contrast.  However, I love how these papers make the paper behind the stairs and tree look like wallpaper, and the diamond lines looks like carpet under the table and the dog! 

I've flattened the card out below so you can see how it looks/where to place on the finished card:


The dog, table, cookies, presents, and bauble images from the Ready for Christmas Stamp Set were all stamped on to Whisper White Card using Basic Black Archival Stampin’ Pad, except for the tree which was stamped using Garden Green Classic Stampin' Pad onto Wild Wasabi Cardstock.  All the images were then cut out using the co-ordinating Christmas Staircase Thinlits Dies using the Big Shot along with the stair case.  There is a stamp for the staircase however, we didn't use it for this card.  Not sure you can quite see in the photos but the thinlits die actually embosses the panelling under the stairs as well as cutting out the shape!  


We coloured the table, cookies, and dog using Crumb Cake Classic Stampin' Pad and Blender Pens.  The presents, baubles, dog's jumper, and the tray for the cookies were coloured using Stampin' Write Markers which are available in each of the colour combinations, Brights, Regals, Subtles, Neutrals, or as a complete full set.  

If you're interested in increasing your ink pads, refills, and marker collections but limited to funds each month, check back soon for an amazing offer where you can spread the cost and build up your supplies for less! 


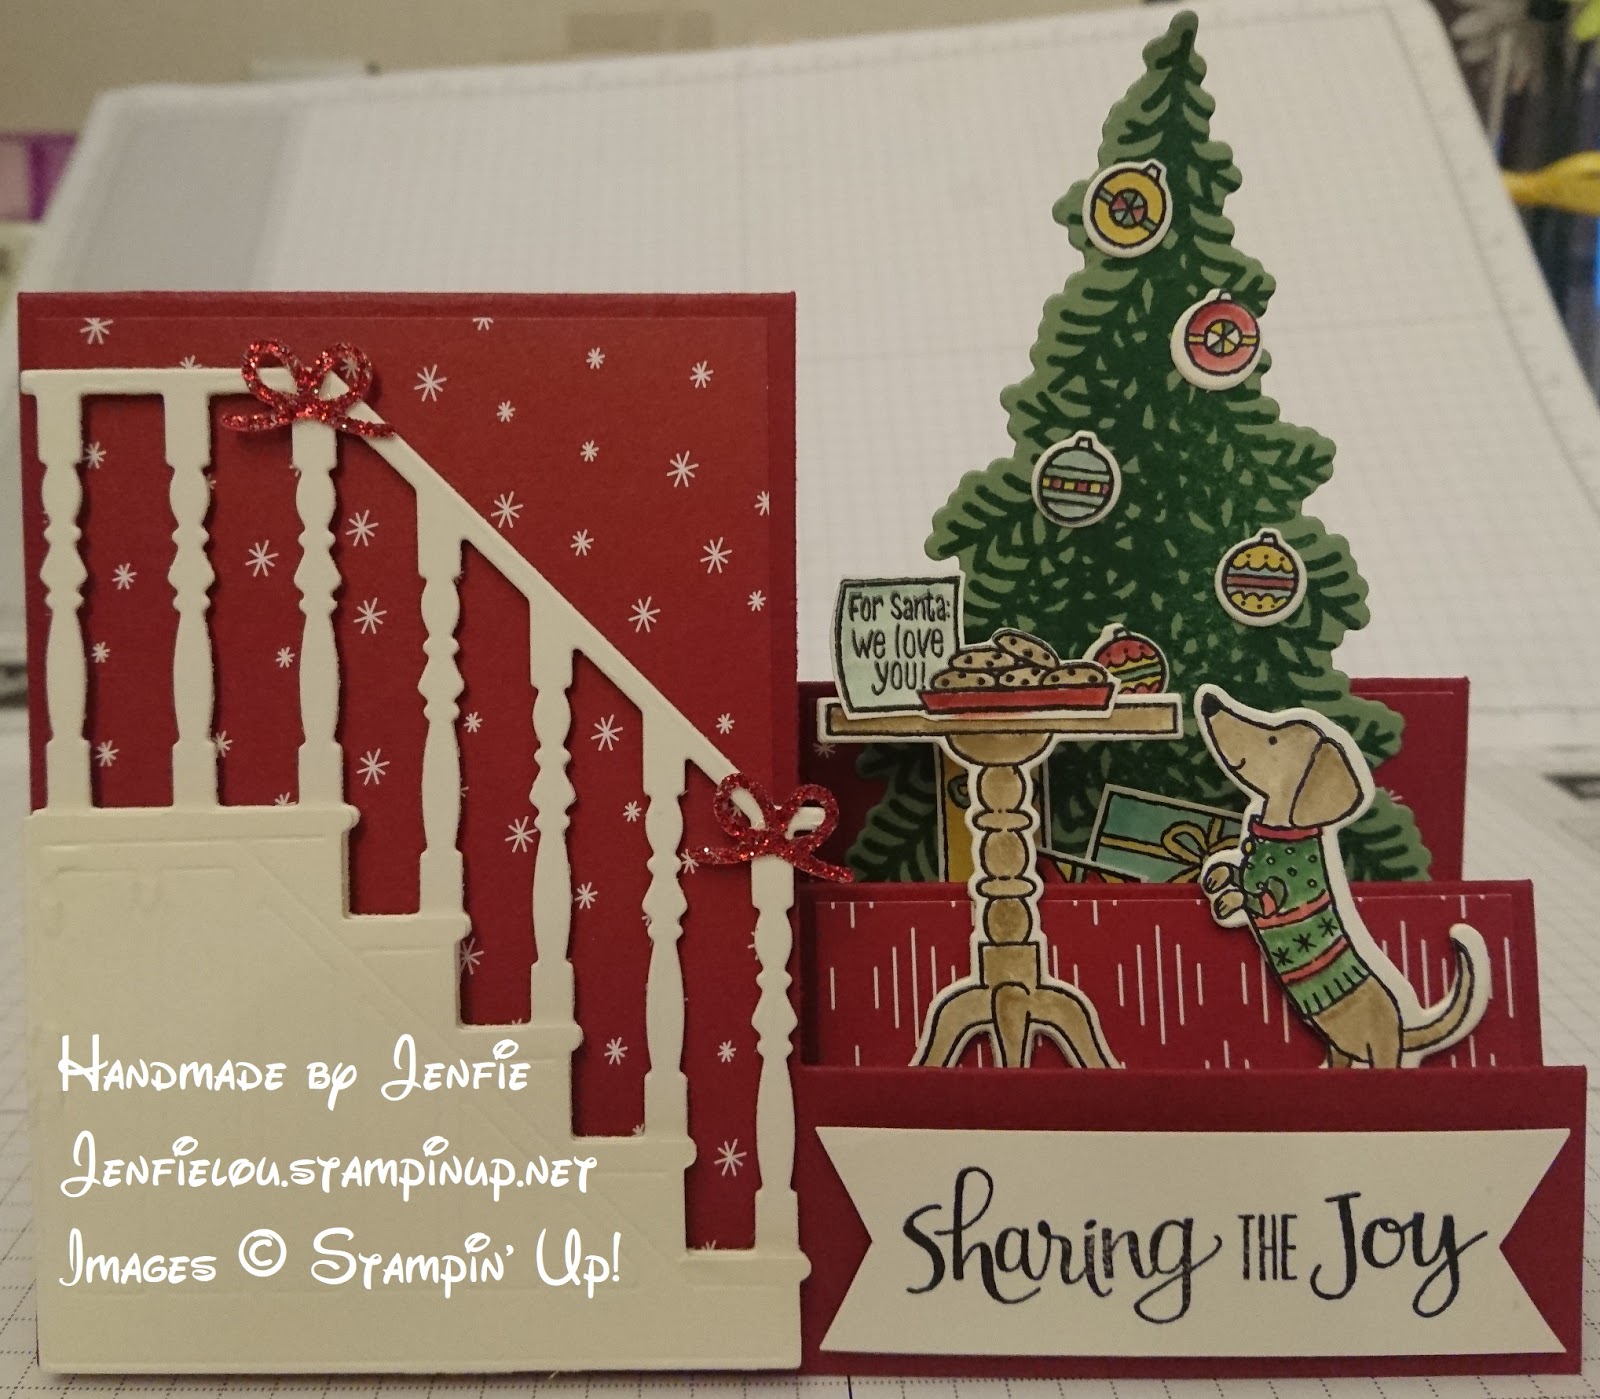
The dog, table, stairs, and sentiment were then attached to the card using Stampin' Dimensionals and Mini Stampin' Dimensionals!  Taking care to only fix the dimensionals to the lower sections of the table and dog so that they stuck to the step but not to the back of the step when it folds down!!!  The tree, presents, and baubles were fixed with glue so that the card could fold flat.  Due to the height and how we placed the tree, there may be need to make your own envelope to fit the card - but don't worry...there's a board for that - the Envelope Punch Board!  Oooh, I almost forgot - the glittery bows on the stairs!! these were cut out of Red Glimmer Paper using the little bow framelit from the set!  


And that, as they say, is that!!  

We spent a wonderful, fun afternoon making this card and playing with the new products and papers.  If you want to see more, get in touch or why not come along to one of my upcoming classes where you too can have a fun few hours releasing your inner creativity! 

Jenfie
x

NOTE: This card was CASE'd but unfortunately I cannot find the original photo detailing the designer's details, this was not our own design however elements have been done differently to the original such as banister decor placement, colouring of elements, and sentiment position.

Monday 21 August 2017

Class Announcement and Seasonal Sneak Peeks - Painted Harvest

Hellooo 

First on the agenda for today's blog post...I have some great news!  

I have now set a date for my new monthly Christmas Card Create Club - the first class will be on Sunday 3rd September at 2pm.  Classes cost £10 per person, places are limited and need to be booked in advance so contact me now via my facebook page @Jenfielou.StampinUp or via my website jenfielou.stampinup.net to book your place!  Why not bring a friend and have a few hours of creativity, I know it's only August - but it's a great time to get a head start on Christmas and have a fun time with friends!! :)

Further dates will be announced soon.  There is possibility for a repeated class on an evening too for those who can't make it to the weekend days - so if you would still like to have a go, get in touch to add your name to the evening session! 

I'm so excited to share two amazing cards with you using products from our upcoming seasonal catalogue!  I have decided to share these over two days as I think they each deserve their own post! 

Well, I recently had the chance to visit my wonderful upline, Monica, in her fabulous studio, and we got to play with some of the BEAUTIFUL and NEW stamp sets and bundles from our new Autumn/Winter seasonal catalogue!  


When I arrived she had made me this gorgeous card using the lovely Painted Harvest stamp set (coming soon).  


This is a 13 piece photopolymer stamp set and features a sunflower which uses the two step stamping method.  There is also two types of leaves, an acorn, and three thankful sentiments in the set.  It is also available as part of a bundle but you'll have to wait and see for the amazing co-ordinating products you can get as part of this gorgeous suite! 

For this card, Monica used Rich Razzleberry Cardstock as the card base, Wild Wasabi for the mount, and Whisper White Cardstock for the main image.  The flowers were stamped using Rich Razzlebberry Classic Stampin' Pad, and the centres used Crumb Cake Classic Stampin' Pad.  The leaves were stamped using Garden Green Classic Stampin' Pad.  The sentiment is stamped in Basic Black Archival Stampin’ Pad and trimmed using Paper Snips!  This was attached with Mini Glue Dots to a piece of Burlap Ribbon which was folded over and tied with Linen Thread.  A self adhesive Gold Faceted Gem just finished the embellishment off beautifully.


The stamp set used for this card will be available to buy from 1st September from our new seasonal catalogue.  If you want to have a look and see what else is coming, get in touch as I have the new catalogues here in my hands already and you could have one too!  All I can show you of the catalogue for now is the front cover: 


Come back tomorrow for another sneak peek card - get "Ready for Christmas" with Stampin' Up! and Jenfie Lou :) 

Jenfie

x

Wednesday 16 August 2017

Thank You's (for recycling your scraps!)

Hello you wonderful blog reader you! 

I have a quick update today to show you how I used the scraps of paper and card stock left over from prepping for the gift bags and cards seen in my recent workshops and blog posts.

I wish I had taken a photo of the scraps before I made them into the set of cards you are about to see because I still look at these cards and think they look intentional, professional, and by no means do they look like left overs!!!

Using 1 sheet of 12"x12" cardstock in each colour (5 colours so 5 sheets of card), and 2 sheets of DSP in each colour (one sheet of each design, so 10 sheets of DSP) I created 20 gift bags and matching cards for the workshops.  All that was left from the cardstock was a 4 inch square and from the papers were four of 1 inch x 3/4 inch offcuts, 2 of each paper! 


For each card, I took a 4"x4" White Card blank and using Tombow (Multipurpose Liquid Glue) I stuck each of the left over cardstock to the blanks.  I then added the four pieces of left over designer series papers to each corresponding coloured card as equally as I could down the left hand side.  As our DSP is doublesided and thankfully there were two of each paper offcuts left, it meant I could show all four patterns! 


I added a piece of Whisper White Cardstock which I cut out using the largest square framelit from the Stitched Shapes Framelits Dies for the Big Shot.  This leaves an impression all around the square that makes it look stitched, it makes a simple square look so much more effective, this one measures 2 and 5/8" (6.6cm) square.  


On each piece I stamped the "Thank You" from the Daisy Delight Photopolymer Stamp Set over two lines in the corresponding 2017-2019 In Color Classic Stampin' Pads.  To do this, I just inked up and stamped one of the two words at a time by holding the stamp halfway over the ink pad, so that I could split the sentiment!  Then, from the same stamp set, I added the "...for your kindness." sentiment underneath.  (The Stamp-A-Ma-Jig came in very handy for lining up the stamps on each card so they were the same).  This was then stuck to the card using Stampin' Dimensionals.  


I decided to add a co-ordinating 2017-2019 In Color Bitty Bows to finish each card, these are self adhesive which makes them so easy to attach! 


And there you have it, a finished set of 5 beautiful cards, using up scraps so absolutley NO wastage from my gift bags and cards! 


Of course, you could add any sentiment to the square and you could mix up the DSP and have different colours to the background cardstock!   Oh the ideas I come up with when I have already finished the cards!  ah well....maybe I'll just have to make some more...or you could have a go yourself - just get in touch for supplies and/or class workshop dates! 

Jenfie

x

Products Used for the above images:

Stamp sets, Punches, Bundles
Card/Papers
Inks
Tools/Embelishments
Adhesives

Saturday 12 August 2017

Workshop Creations and a Welcome to the Neighbourhood with In The City Host Rewards!

Hi Everyone!

It has been a VERY busy week for me this week, with my first two Stampin' Up! workshops, on Saturday afternoon and Monday evening, kicking it off to a great start! 

Here are a few of the ladies creations from Saturday's afternoon workshop where we created gift bags with matching 4" cards, and a small vase of Delightful Daisies! 


At the evening workshop I showed the ladies how to use the other stamps in the Daisy Delight Photopolymer Stamp Set to create a simple but elegant card which is CASE'd from a Stampin' Success workshop of the month ideas sheet


Then we all made the gift bag and matching card as before, but added a Clear Faceted Gem to the middle of our daisies to make them extra special! 

Unfortunately, this was the only photo I took of a finished creation from the Monday night and it was the one I made, so I don't have any of the ladies creations to share with you :(

Thanks to the lovely ladies orders over the evening reaching £150, our hostess was able to earn her Stampin' Rewards and used them to purchase the fabulous In The City Photopolymer Stamp Set!  I love this stamp set so much and couldn't wait to get my hands on it myself! It is so versatile but I hadn't had chance to play with my own set to show her some examples!  So whilst we're on the countdown to their orders arriving I thought I'd have a play with mine this weekend, and what better excuse than to welcome the new neighbours who moved in yesterday! 


I'll leave it there for today, I need to go plan some more workshops!  If you're interested in coming to a class or hosting your own workshop with friends  you can see my availability and contact me through my website at Jenfielou.stampinup.net.  I'd love to catch up with you soon! 

Jenfie
x

Products Used for the above images:

Stamp sets, Punches, Bundles
Card/Papers
Inks
Tools/Embelishments
Adhesives

Sunday 6 August 2017

New Arrivals...of the little human kind!

Good Evening!

Today we're celebrating new arrivals, of the baby kind! 

In the past few weeks we have welcomed four little ones to the world (well not me personally of course - friends and relatives!) So, I have four baby cards to share with you (and there is another one on their way!) 

So far we have two baby girls and two baby boys.  I'm sharing the cards in order of baby arrival:


All the cards are 6"x6", cut and scored using the Stampin' Trimmer.  

I have listed below the supplies used to create these cards:

Stamp Sets
Inks (Refills and Markers are also available)
Cardstocks
Embelishments

A couple of offers to note before you go:

  • There is a new hostess code TBJCMQZH - for any orders placed in August through my online shop. If you use this code when placing your order, I will send you a little thank you! (If your order is over £150 please do not use this code as you will have earned your own Stampin' Rewards!)
  • There is an early release for you to get your hands on!! In advance of the new Autumn/Winter Seasonal catalogue which goes live on 1st September! You can order the Carols of Christmas Stamp Set, Framelits, or the BUNDLE now!
Thanks for stopping by, right I'm off to prepare for my second workshop (as it's an evening one and I'll be at work during the day so I need to make sure I have packed everything up ready!  Note to self: don't forget anything! eek!)

See you again soon!

Jenfie
x